Monday, September 17, 2007

Making Spiderman


Recently I started the process of making a Spiderman vinyl model that I found at Navy Blue at Seacon Square for a mate of mine in Boston - Eric Ryan. He is a big fan of the superhero. I really enjoy making models and giving them away to people who will appreciate them - not sure why but it gives me great satisfaction to think that somebody I know has my model up where they look at it and other comment on it regularly.

You can see from the picture above initally pieces of Spiderman's body were super glued together. Note the photo next to the figure, this came with the model to give you an idication of what the final result should look like.

After attaching all the limbs all the joins need to be filled with putty. I did this in stages. First time round adding plenty of putty waiting for it to dry then sanding down. Then I sprayed the joins with plastic primer which brings out the problems then I repeat until all the joins looked good to my eye and finished with a complete cover of the primer.


Next I masked off the blue areas and sprayed with gloss red lacquer. I just use these 40 baht spray cans that I buy up the road from the local plumbing shop. Very cheap and give a good result however the range of colors is quite limited. In this case however the color pick is not a problem.

In the picture above I've masked off the red areas and was about to apply the blue when I had a bit of a brain storm. I thought rather than create the model as it is - the old style cartoon Spiderman, why not update it to the modern movie version?

After thinking about this for a while I decided to go for it. Firtly I puttied out the old style spider icon ingraved on the back of the figure and sanded it back before spraying the blue areas.


While leaving that all to dry I got on the net and found this pic (see below).


I took this into Illustrator where I traced the spider icon to create a vector outline of it. I measured my figure and then reduce the icon to two sizes one for the front and another for the back and then printed it out. I then cut out the printouts and glued them to some relatively thin sheet styrene and cut them out.


After cutting them out I worked them over a bit with my new engraver tool then sanded them down and gave them a quick spray of the plastic primer.


Bellow is a picture of the model with the blue and red areas dry ready for the wash of silver to go into into the web grooves in the red areas.


After the silver was dry I super glued on the spider icons and gave the model two coats of clear varnish lacquer. The following are a couple of pictures of the final model mounted on a grey board.


Thursday, August 16, 2007

Interesting UFO content

The following is a nice video from Haiti, showing two UFO's going over the camera operator also there looks to be some in the distance. A lot of people regard this as a fake, but it does look rather good - I certainly would like to build a model of this type of craft.


UFO Haiti - Watch more free videos


The following link is to a website with some facinating stuff on UFO technology.

UFO UAV technology

Wednesday, August 08, 2007

Science Fiction Models

Recently I have build some models that are non miltary in nature. These are fun for me and make excellent presents.

Silver Surfer

This is a Marvel Univer Vinyl Model Kit I found at Navy Blue. Navy Blue is a small store in Secon Square that sells second hand model kits and BB guns. The other day I purchased another eight of this style of kit. Amongst them I picked up Spiderman, Superman and The Spawn - I will post pictures of them as they are completed.

Roswell UFO

This is a Testors kit - quite simple to make but took me an age to finish. I was going for a liquid metal look but could not quite pull it off. I settle for a more worn finish instead.

Bandai Gamirez Space Ship

This Japanese kit I found at Navy Blue as well. It was put together and finished with just a little black tempura to bring out the recessed and sprayed with clear lacquer.

Trumpeter Type 33 Submarine


Recently I build this Model 33 Summarine of the PLA of China for a friend. The final result I'm quite happy with. I did a considerable amout of experimentation with the finishing.

Finishing process
  1. Sprayed with lacquers
  2. Wash with highly thinned enamals
  3. Applied Tamiya weathering master rust powder
  4. Sprayed with clear gloss lacquer
  5. Painted with dark grey tempura and polished (to leave dark grey in resessed areas only)
  6. Sprayed with clear matt lacquer

Saturday, February 03, 2007

Academy Handy Hopup


I thought I would share with readers of this blogg a recent little experiment of mine. For christmas I was given a very cool little toy foam electric airplane (X-Twin Classic-Trainer) with remote control - amazing really that you can get a fully remote control flying toy for less than $40 USD.

However I thought that the foam unit was a bit clunky so I was looking around for an ultralight airframe to repurpose the electronics found in the X-Twin. The other day I was in a model shop and came across the Academy Handy which is really designed to be rubber band powered. I omitted the rubberband in the build and added the engines, controller and battery from the X-Twin to make my Adedemy Handy Hopup.


I have not had a chance to fully test the flight characteristic of this baby yet. But when I do I'll let you know :)

Tuesday, October 31, 2006

Interesting video

I was emailed this video a week or so back by a friend. I think viewers of this blog will find it interesting.

Friday, October 06, 2006

From Berny

The following is an interesting post from Finescale.com forum from Berny (former USAF) on the subject of air to air missile smoke trails.

The early AIM-7's and AIM-9's left a large smoke trail behind them. After the rocket motor burned out the missile would go into a coast mode but still tracking the target. Depending on how far the target was from the shooter would depend on the coast mode. At twenty miles the last five miles would be coast mode for the AIM-7. At six miles the last mile would be the coast mode for the AIM-9. These heavy smoke missiles are no longer being used except for live fire until the rocket motors are used up.

Later versions of the AIM-7 and AIM-9's and the new AIM-120 use low smoke rocket motors and the range was improved. The rocket motors would fire longer thus giving the missile longer range. The actual range is still classified so I can't give you an example. They still left a smoke trail but not as heavy as the early versions.

Russian missiles leave a large smoke trail. They are just begining to build missiles with low smoke rocket motors.

When you see a live fire at a target aircraft (drone), the target is "making smoke" so it can be tracked by the camera aircraft. You can see the heavy smoke from the drone and missile as they impact. It is really something to see from the air.

From Mel Sharkskin

I recieved this interesting post from Mel Sharkskin on the Finescale.com aeroplane forum where I advertised my recent missile launch photos found on this blog. So interesting was the post that I thought it would be good value to repeat it here - Mel I do hope y ou don't mind :0

Tonant, I am extremely impressed with your photos. You asked for input, so this is mine, and take it for what it's worth. I've not, as much as I'd liked to, ever been in a tactical aircraft while it fired a missile. The closest I ever came was while being "chauffered" about in a 98th TFTS F-15B out of Tyndall AFB
-- we crept up on an unsuspecting Cessna puttering along at about 2,500 ft. and locked onto him with the F/A-18B's IR seaker. There was the unmistakable "rattlesnake" sound of a solid lock. I subsequantly heard the same from the back of an F/A-18B and a couple of Air Guard F-4s, and one of these had locked onto a Delta 727 over the Gulf of Mexico! I was so disappointed in those pre-9/11 days that the passengers couldn't see us "attacking their airplane, running up on its
six from a full 20,000 feet below it.

Forgive the memory-lane digression: Having been to William Tell a couple of time as a reporter, I remember there was a screening room on the base, and it was there that they showed the live-fire competitions in real time from the various photo ships, cutting from time to time to a HUD's eye view from the shooter's a/c. They were still firing AIM-7 Sparrows then (late '80s and early '90s), and when the missile, both the Sparrows and the Sidewinders left the rails, there was a very bright flash accompanied by some smoke. I can't imagine how you will simulate any smoke, so I'd do as you've done and have the weapon far enough away from the rails to have left the smoke behind.

(And I winced with pain every time a poor F-100 got it at Wm. Tell, since by then they'd already shot up all the QF-102's, and at this time were already configuring the remaing F-106 fleet to die this kind of death, and they had some on hand, though at this time were not shooting at them. That would have hurt even worse, because I love that airplane.)

One criticism I might bring is the shock diamonds. I believe those are more an effect of air-breathing engines more than small missles. So if you leave them in for the nice visual effect, tone them way down. Otherwise, what fantastic work you have there!

Now, if you want to do an air-to-air weapon with one mighty launch replete with fire, smoke, thunder and general hell-above-earth, get on the web and find photos of the old Genie nuclear rocket being fired. There's some fine photos of it being shot from the F-106, and some photos of live-fire launches from F-101Bs. The blast of this huge rocket (it wasn't technically a missile since it wasn't guided by anything more than pointing the airplane in the general direction of an enemy bomber formation and letting the 1 k warhead do the rest. They only shot one of those warheads live, from an F-89 in the 1950s, and then some sane people began to question how those folks over whose homes these things would be fired might feel about the whole thing.)

But the blast of the engine lighting was so great, to prevent setting the launch airplane on fire they had to attach the rocket to a 20-some-foot lanyard with a pin at end in the rocket. The 13-foot-long Genie was dropped, and when the pin was yanked from the round it was lit and on its way in a spectacularly fiery launch (this was also the way the earlier. gigantic Tiny Tim air-to-ground rocket was launched). The launch plane then was supposed to immediately split-ess away to avoid the blast, but a friend who fired one from an F-101B (sans the warhead, of course)told me he was so mesmerized by the spectacle of this monstrous weapon roaring from his airplane, he forgot the maneuver altogether.

So you asked a simple question and I gave you a treatise. Please show us some more of your work. It's really the best of this type I have seen.

Friday, September 29, 2006

Missile Launch No.2


Specifications
  1. Model: 1-48 Scale Academy MIG 21 PF
  2. Finish: automotive acrylic spray paints, utilizing sludge wash weathering technique and utilized the Chinese Air Force Decals. In this case I have removed the starboard side air to air missle from it's rack
  3. Shoot: just after rain in Bangkok out the back window of my apartment in Ekamai, in this case I have increased the resolution to the maximum my digital camera can take 5 megapixels.
  4. Retouch: Very similar approach to previous post however with a new missile launch source pic (see below)


Missile launch source pic

Missile Launch No.1


Specifications

  1. Model: 1-48 Scale Academy MIG 21 PF
  2. Finish: automotive acrylic spray paints, utilizing sludge wash weathering technique and utilized the Chinese Air Force Decals. In this case I have removed the starboard side air to air missle from it's rack
  3. Shoot: just after rain in Bangkok out the back window of my apartment in Ekamai, in this case I have increased the resolution to the maximum my digital camera can take 5 megapixels.
  4. Retouch: 1st I montaged in a missle launch from a pic I found on the web (see following). I had to resize and rotate it. I then cloned it make one version darken only and rubbbed out the contrail and the other lighten only where I rubbed out the missle and left over content.
    After this I added another layer in which I created a white cone to complete the rest of the smoke trail. To this layer I added blur a wave filter (to make the smoke less regular) , reduced its transperancy and then added noise to make it sink into the pic.

    Then I touched out the fishing line.

    The tailpipe looked a bit dark so I added a lit tail pipe from an F16 I found on the web (see following). I cut this out, flipped, made larger, rotated, reduced transperancy, blurred and added noise to make it sink in.

    I have added the original pic below also so you can see the start position.


Start Position Pic


Lit tail pipe source pic


Missile launch source pic

Thursday, September 21, 2006

Afterburner & vapour trails

Specifications
  1. Model: 1-48 Scale Academy MIG 21 PF
  2. Finish: automotive acrylic spray paints, utilizing sludge wash weathering technique and utilized the Chinese Air Force Decals.
  3. Shoot: a relatively sunny day in Bangkok out the back window of my apartment in Ekamai, in this case I have increased the resolution to the maximum my digital camera can take 5 megapixels.
  4. Retouch: I have added contrails at the wing tips using a blurred and semitransperant layer, also I've montaged in an afterburner flame I found on the net using the lighten only composite function, masked plane and sharpened and lightened it, added noise, touched out fishing line

Republic Thunderjet


Specifications
  1. Model: 1-48 Scale Tamiya Republic Thunderjet
  2. Finish: sandpapered aluminium foil with sludge wash and clear coat
  3. Shoot: Rainy afternoon outside back window (suspended on stick out of tail pipe) and on balcony
  4. Retouch: touched out stick, added differing motion blurs, added vapour trails (to flying pic), desaturated and added a bit of noise.

Comment: These pics are amongst my very first attempts - not so good but interesting enough to set me on this path of photography.

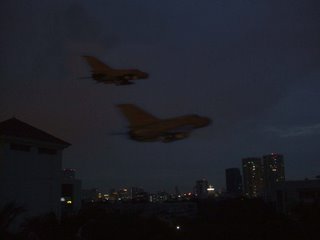
One night in Bangkok!


Specifications
  1. Model: 1-48 Scale Academy MIG 21 PF
  2. Finish: Same as previous post
  3. Shoot: On a clear night out my back and side balaconies, strung up on a pole with fishing line
  4. Retouch: added noise, added afterburners and montaged three pics using "darken" composite effect to create wingman, reduced size of jets on sky background to try and make more realistic

1st set of pics


Specifications

  1. Model: 1-48 scale Academy MIG 21 PF.
  2. Finish: automotive acrylic spray paints, utilizing sludge wash weathering technique and utilized the Chinese Air Force Decals.
  3. Shoot: a relatively sunny day in Bangkok out the back window of my apartment in Ekamai
  4. Retouch: slighly desaturated, added about 2-3% noise, masked jet from background with feathered edge and applied different motion blurs between model and background.

Welcome to Fine Scale Realistic

Recently I have gone back to my old hobby of making models. I am subscriber of Fine Scale Modeler Magazine and have been learning the techniques of making realistic looking models.

My interest currently is in cold war jets. As such I've built a MIG 15, MIG 17, MIG 21 and Republic Thunderjet to date. After building these models I naturally wanted to take photos of them to show to my friends.

I currently live in Thailand in quite a tall apartment building. When taking my photos my girl friend Sunisa suggested I take a photo with the skyline as the backdrop. One thing led to another and I started looking for ways to make my models look like they are actually flying.

This site is dedicated to shots of models made to look real. If you have a shot like this and would like to share it with other please email me and I'll set you up so you can post your work too.

PS I have never seen any shots like this in Fine Scale Modeler Magazine - but it does seem an obvious thing to do. If you know a site that already exists with shots like this including techniques to make things look more realist please drop me a message.